📺 CALIBRATION TOOLS:
✅ https://amzn.to/2Kw2bJP
☑️ https://amzn.to/37keXo1
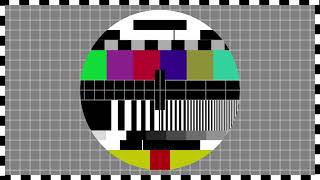
4K UHD (3840x2160p) Test Card 30 minutes Calibration video with Timer. Easy Calibrate your UHD TV, 4k Projector or 4k Monitor. 30. min. video with Test Pattern, Timer and Ambient Sound. Use For Calibration UHD TV Test or HD/UHD Projectors. TV test video 4k
~-~~-~~~-~~-~
Please watch: New repaired version
• 🔝 UHD Calibration video 4K Test patte...
~-~~-~~~-~~-~
For many questions how to use it, I will summarize at least the basic principles. I hope it helps you at least a little.
HOW TO USE:
If you are not use colorimeter, or calibration tool like this:
https://amzn.to/2Kw2bJP
https://amzn.to/2P8Ibyy
....you only have to rely on your eyesight.
We won't dive into the service menu to make minute or precision changes just yet, and nothing we're about to do here is any substitute for the work of a professional calibration service. The goal here is to optimize the picture for your viewing environment and your preferences, and save you from spending money on an entry-level calibration service when you could do the same yourself.
I will summarize at least the basic principles.
Step 1: Eliminate Overscan for Full, Pixel-to-Pixel Viewing.
The first and easiest change you can make to your TV to improve your viewing experience is to eliminate overscan. Overscan is the over-projection of an image beyond the borders of your HDTV or projector screen. Check screen position and center it by the belts on the sides. The circle must be in the middle and the thickness of the side belts the same.
Step 2: Tweak the Brightness for Deep, Dark Black Levels
Brightness on a television, or "black level," on some sets, actually has little to do with how much "pop" the screen has, and instead defines at what level the darkest areas of the screen stop. In other words, it's the setting where your TV stops reducing power to the pixels and says "okay, that's dark enough to be black." Turn it up too high, and black areas in your picture are washed out and grainy. Turn it down too low and you lose all detail in dark areas of a scene, and everything looks like it was shot in a basement.
Brightness should be configured when the TV is nice and warmed up and the lighting in your living room or bedroom is set to its normal level for when you watch television. This is important-the degree to which the human eye can interpret detail in dark areas is directly related to the amount of ambient light in the room, so make sure the lighting in the room is normal for when you most often watch your television.
Step 3: Adjust the Contrast for Pure, Bright White
Contrast (not Contrast Ratio, which is not something you can change) represents the total light output of the picture. Contrast settings define the overall light output of the set, and this time your goal is to keep the light output as high as possible without sacrificing image quality or detail. Watch the band above the timer and set the optimum level.
Make sure that the background around the circle is truly black and you don't see blinking stripes just the white grid in the background. Make sure that the area at the top of the circle around the channel name and on the sides of the timer is either pure white and does not flicker, or that the gray bands above the timer are gray without any color or shade. Make very fine adjustments here, nothing big.
Step 5: Adjust the Sharpness for a Clearer Picture
Sharpness creates the illusion of brighter and brighter images by artificially inflating the peak white on the display. You add information to the image you see on the screen, and by increasing the sharpness, you try to cross the line between the black and white thin lines and edges are not blurred and everything is as sharp as it can be. The pattern in the circle above the numbers of the screen will be your guide here.
Step 6: Make Sure You're Not Bleeding Colors
Finally, it's time to check and make sure that you can clearly see the difference between each color in a broad gradient, that you can clearly see the difference between green and red, and the difference between shades of green and red. Observe the shades of colors in the upper half of the circle. On the sides of the calibration video, there are 3 circles of pure reference colors of the RGB spectrum.
Now that your TV is calibrated, you can trust that you're seeing the Blu-ray movies and streaming video you own the way they were intended to be viewed, and the best your HDTV can display given your living room. However, HDTV calibration doesn't stop here. In fact, we've only scratched the surface of what you could do.
And remember to watch : https://amzn.to/37keXo1


Информация по комментариям в разработке