In this video, I review and unbox a 40pc Ohuhu marker set from Amazon. I briefly compare the Ohuhu markers vs copic markers. I do a brief marker art tutorial on how to draw with alcohol markers, and copic markers blending.
Ohuhu Markers from Amazon
https://amzn.to/3gDhGT0
I found found that this set of 40 pc Ohuhu markers can be successfully separated into 10 different colored sets. This should be more than sufficient for most people’s needs. The only thing that is missing is a light skin tone. If you want a light skin tone, I think Copic’s E53 - Raw Silk works great!
Here is how I organized my Ohuhu Markers:
1) Cool Grays - BG042, BG082, MG170, Black
2) Teal - B289, G482, G850
3) Blue - B290, B956
4) Green - G284, G472
5) Yellow Green - G289, G554
6) Warm Grey - WG150, WG170
7 Orange - Y397, Y691, YR792, R865
8) Pinks - RV390, RV610, RV968
9) Violets - V284, V369
10) Brown - Y679, E769
You will have many leftover markers. Markers not in a set should be stored aside and be used as accents or backups.
I have found that the color caps and numbers don’t always make sense. If you want to accidentally chose the wrong marker, you could consider putting a piece of masking tape, or label on top of the marker cap and relabeling it (Grey #1, Grey #2, Grey #3 so on…)
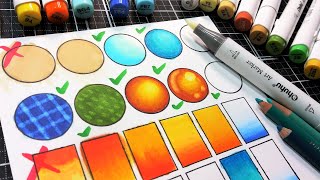
- How to Blend Markers -
To properly blend your markers, you will need to switch back and forth between 2 colors. It’s okay if they don’t look smooth right away, after about 10-15 minutes, the paper absorb the markers, and the will blend by themselves.
Start with the light marker and put down the colors. Come in with the darker shade and put it down, along with a couple of thin lines. Use the lighter shade to “double hit” that intermediary area. Save your “double hits” for when you need them.
This technique is quite different from the “feathering” technique you see a lot of Youtubers like “DrawingwiffWaffles” use. The technique I’m showing was developed for creating a lot of plastic and metallic objects such as toasters, and cars. It is an industrial design drawing technique.
If you are having trouble blending, you could try “kissing” your markers. That’s when you touch your markers together to temporarily change the color. Put down your markers and notice that they will temporarily be lighter/ darker.
I personally don’t really like the cool grays they have provided in this set. The grays in this Ohuhu set feel like… 10%, 50%, 70% grey, whereas closer intervals of 30%, 50%, 70% will lead to more success and comfort in this endeavor. I would recommend purchasing a separate set of cool grays.
Azure 7 pc Greyscale set from Amazon/ Walmart. $7
Walmart sells them for $7. Amazon sells them for $13. Fantastic bargain if you can get your hands on them. I tried them out, and they are fantastic quality at a very affordable price.
https://amzn.to/3TH7pnn
Copic Ciao Markers - 3 Individual Markers - $11.70
Here are the colors you need: Cool Gray 3, Cool Gray 5, Cool Gray 7
https://www.dickblick.com/products/co...
The best way to make sure your markers blend together is to make sure you have chosen compatible ones. My teacher always stressed how important it is to go into the art store and buy the markers in person and test out the colors. A lot of the markers you get in a set are frankly incompatible and are frankly a bit of waste. However, considering that Ohuhu markers are such a great deal, you are still coming out on top even if you don’t use half of them!
Use the sets that I recommend, and you guys should be fine. Good luck.
Let me know if you guys want to me more marker content from me.
Take art classes with me at http://www.chris-chien.com


Информация по комментариям в разработке